


The Essential Guide to RV Caulking: Protect Your Investment
- Lee Burbank

- Feb 15
- 6 min read
Updated: Mar 24

There are countless upgrades you can make to an RV. Think solar panels, suspension systems, electronics, or even interior remodels. But none of these enhancements matter if water gets inside.
Caulking might not be glamorous or exciting, but it is one of the most crucial maintenance tasks you will ever perform on your RV. When sealant fails, water enters. And when water enters, damage spreads quietly and expensively.
If you stay ahead of your seals, your RV can last for decades. If you don’t, repairs can quickly exceed the value of the rig.
Let’s walk through what water really does, what it costs to fix, and how to properly inspect and reseal your RV from the roof down.
Why RV Caulking Fails (Even When It Looks Fine)
RVs are not like houses. They flex while driving, twist when entering driveways, and sit in direct UV exposure for years.
Sealants shrink, dry out, crack, and separate at the edges. The frustrating part? They often look fine until they aren’t. Tiny hairline separations are enough for water to enter. Once it does, it doesn’t just drip straight down. It travels along framing, wiring, and insulation.
This brings us to the real problem.
What Water Damage Really Does to an RV
Water damage is rarely isolated. It spreads, wicks, and weakens the structure long before you see a stain.

Delamination
Delamination occurs when water breaks the bond between the fiberglass exterior and the substrate beneath it. You’ll see bubbling or rippling in the sidewall.
Once delamination starts, sealing the leak does not reverse the damage. The bond is already compromised. Repair typically requires removing the outer fiberglass layer and rebuilding the wall section.

Wood Rot in Walls, Roofs, and Floors
Most RVs still rely heavily on wood framing and plywood substrates. When moisture enters and stays trapped, rot begins.
Floors near slide-outs, bathrooms, and entry doors are common failure points. Roof framing can rot for months before interior damage appears.

Insulation Breakdown and Mold
Wet insulation loses its effectiveness, and mold can form behind wall panels long before you smell it. Even if structural damage is minimal, hidden moisture can significantly affect resale value.
Electrical and Appliance Damage
Water intrusion can corrode connections, damage control boards, and cause intermittent electrical issues that are difficult to diagnose.
Why Water Rarely Stays Where It Enters
Water almost never drips straight down. It follows structure and gravity. A small roof seam failure can show up as a floor issue six feet away. By the time you see interior evidence, the problem may be extensive.
What Water Damage Repairs Actually Cost
Water damage repairs are labor-heavy and invasive. Here’s what that can look like in real numbers.
Minor Roof Leak Caught Early
Work involved:
Remove interior trim
Dry affected area
Replace insulation
Reseal penetration
Typical cost: $800–$1,500
This is the best-case scenario.
Wall Delamination Repair
Work involved:
Remove fiberglass exterior panel
Replace substrate
Rebond and refinish surface
Typical cost: $3,000–$7,000 per section
Floor Rot Near Slide or Bathroom
Work involved:
Remove furniture or slide
Cut out damaged flooring
Replace framing and subfloor
Reinstall components
Typical cost: $4,000–$10,000+
Major Long-Term Water Intrusion
Multiple structural areas, electrical reruns, roof framing.
Typical cost: $15,000–$30,000+
In many cases, insurance totals the RV. This is why preventative resealing matters.
A Top-to-Bottom RV Caulking Inspection Guide
We always inspect from the roof down.
Start on the Roof

Seams and Roof Edges
Inspect all roof seams and front and rear cap transitions. Look for:
Cracks
Shrinking
Lifting edges
Gaps forming at corners

Vents, Skylights, and Antennas
Every penetration is a potential leak point. Sealant should be smooth, flexible, and fully bonded at edges.

Small hairline cracks may look harmless from a standing position. Up close, they reveal separation starting at the edge. These are early warning signs.
Solar Panels, Ladders, and Roof Accessories
Mounting brackets are common leak sources. Movement while traveling stresses these points constantly.
Upper Sidewalls and Transitions
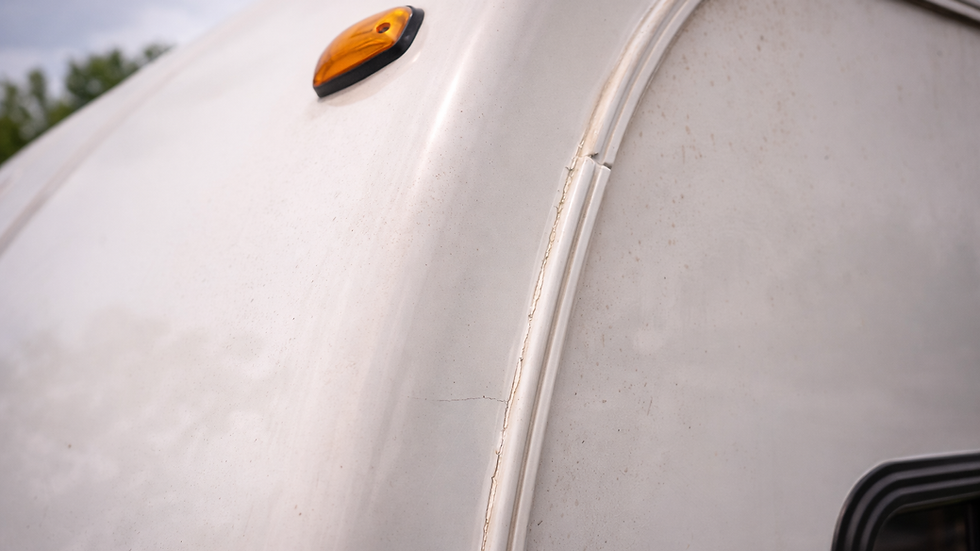
Front and Rear Cap Seams
These joints experience constant flex. Use non-sag sealant here.
Marker Lights and Awning Brackets
Small penetrations matter. Remove and reseal if necessary rather than simply smearing new sealant over a failing joint.
Appliances and Exterior Penetrations

Water Heater
The flange should be sealed with butyl tape behind it and exterior sealant protecting the perimeter.
Refrigerator Vents
Check top and side vents. Heat cycling accelerates sealant failure.
Exterior Hatches and Utility Ports
Inspect water inlets, cable ports, and electrical hookups carefully.
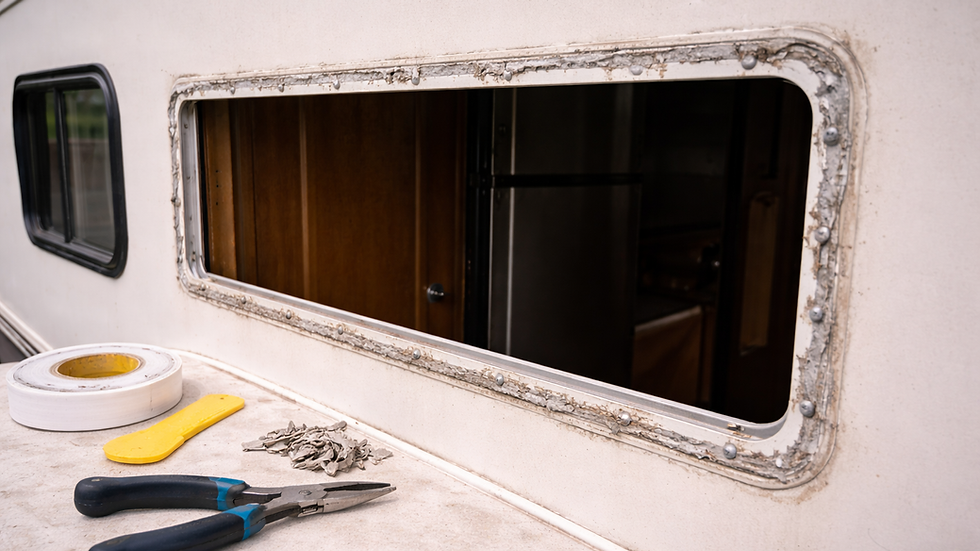
Windows and Doors
Understanding Window Leak Paths
Most window leaks originate behind the frame, not at the exterior bead.
When Exterior Caulking Helps
If the sealant bead is cracked but the frame remains tight, resealing may solve it.
When Windows Must Be Removed and Resealed
If leaks persist, the window should be removed and fresh butyl tape installed.
Lower Walls, Storage Bays, and Undercarriage Edges
Road spray pushes water upward. Inspect compartment doors and lower seams carefully.
Using the Right Sealant in the Right Place
We have used products from Dicor on our RVs for over 24 years. See links at the end of this post. Not because they are flashy, but because they are predictable and formulated specifically for RV flex and UV exposure. Consistency matters.
Dicor Self-Leveling Lap Sealant Applications
For horizontal roof surfaces and penetrations. It flows and levels itself for full coverage.
Dicor Non-Sag Sealant Applications
For vertical seams and sidewalls. It stays where you apply it.
Where Butyl Tape Fits Into the System
Butyl tape seals the joint between surfaces. Exterior sealant protects the tape from weather.
When Silicone Is Appropriate (And When It Is Not)
Silicone has its place.
Situations Where Silicone Performs Well
Glass-to-metal applications
Certain window frames originally installed with silicone
Interior trim areas
Why Silicone Should Not Be Used on Most RV Roof Seams
It does not bond well to many RV roofing membranes and is difficult to remove later.
The Removal and Compatibility Issue
Once silicone is used, future resealing becomes more complicated because many products will not adhere properly to silicone residue.
Proper Caulking Techniques That Prevent Future Damage
Surface Preparation and Inspection
Clean surfaces thoroughly. Remove loose or failing sealant.
When You Must Remove Old Sealant Completely
If sealant is:
Cracked deeply
Lifting
Separating from surfaces
Applied improperly
It should be removed.
When It Is Acceptable to Apply New Sealant Over Existing Sealant
If the existing sealant is:
Fully bonded
Flexible
Clean
Structurally sound
You can clean it and apply a fresh bead over it for reinforcement. Complete removal is not always necessary.
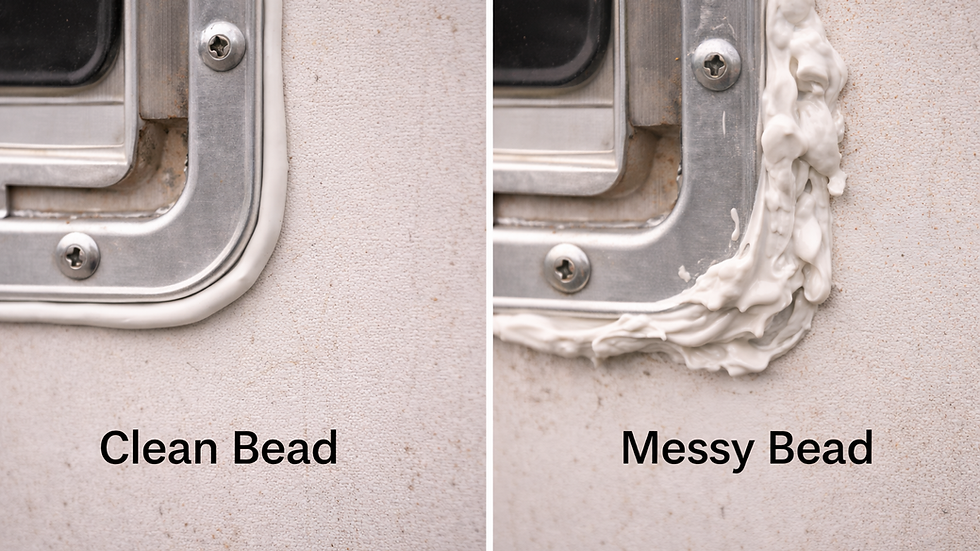
Application Techniques for Clean, Continuous Beads
Apply steady pressure. Maintain a consistent bead size. Avoid excessive buildup.
Curing Time and Weather Considerations
Follow manufacturer cure times. Avoid rain during the initial cure period.
When to Hire a Professional to Reseal Your RV
Sometimes the job is larger than it appears.
Signs the Job May Be Beyond DIY
Extensive cracking across the entire roof
Interior damage already present
Multiple areas failing simultaneously
What a Professional Reseal Service Includes
Removal of failing sealant
Surface preparation
Correct product application
Cure time
Final inspection
Estimated Costs for Roof and Full-Body Resealing
Roof inspection and reseal: $300–$800
Full roof strip and reseal: $1,500–$3,500
Comprehensive top-to-bottom reseal: $1,500–$4,000+
Professional labor is not simply applying caulk. It is preparation and proper restoration.
How Often You Should Inspect and Reseal Your RV
Quick visual inspection: every trip.
Hands-on inspection: twice per year.
Full reseal mindset: annually or before extended travel.
Recommended Products
For the side walls and vertical surfaces...
For the roof and all hatches, fixtures, and horizontal surfaces...
Final Thoughts: Caulk Is Cheap. Structural Repairs Are Not.
Sealant is inexpensive. Structural repair is not. Staying ahead of your seals is one of the simplest and most financially responsible habits you can build as an RV owner.
Water damage is preventable. And prevention is far less expensive than reconstruction.


Comments